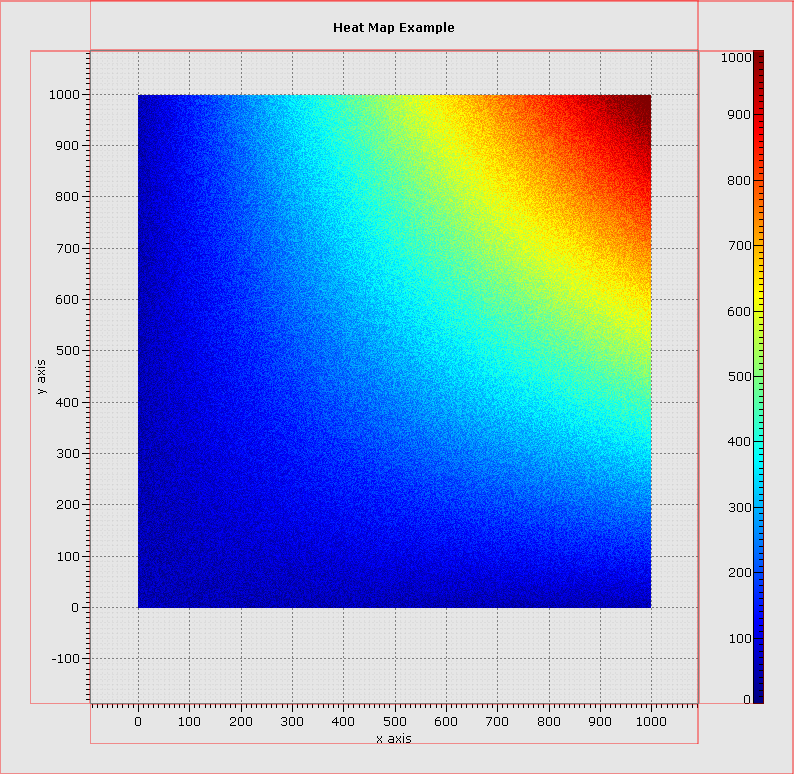
The easiest way to get familiar with what Glimpse offers and how it works is to check out the large library of examples in the core-examples and extras-examples modules. Each example consists of a single runnable Java class that demonstrates a feature of Glimpse. Here's the output of HeatMapExample.java:
All Glimpse applications start with a Glimpse Canvas (source) which wraps a JOGL GLDrawable. A GlimpseCanvas, and the GLDrawable it wraps, are abstractions for generic OpenGL rendering targets. For Swing applications, the concrete GlimpseCanvas implementation NewtSwingGlimpseCanvas, is a JPanel and can be directly incorporated into an existing Swing application. SWTGlimpseCanvas provides the analogous capability for SWT applications. Other GlimpseCanvas implementations exist for drawing to off-screen buffers.
The following code snippit is all that is necessary to create a Swing JFrame containing a GlimpseCanvas:
    public static void main( String[] args )
    {
        NewtSwingGlimpseCanvas canvas = new NewtSwingGlimpseCanvas( );
        new FPSAnimator( canvas.getGLDrawable( ), 120 ).start( );
        JFrame frame = new JFrame( "Glimpse Example" );
        frame.add( canvas );
        frame.setSize( 100, 100 );
        frame.setVisible( true );
    }
A NewtSwingGlimpseCanvas can be constructed and added to a Swing application like any other Swing Component. Other NewtSwingGlimpseCanvas constructor arguments allow sharing of OpenGL Contexts between GlimpseCanvases, but the simple zero argument constructor suffices here. Adding the GlimpseCanvas to a FPSAnimator automatically redraws the GlimpseCanvas periodically
When this snippet is run, a window with a 100 pixel by 100 pixel black square will appear on the screen. In order to get something more interesting showing up, we need to add GlimpseLayouts and GlimpsePainters to the canvas.
Example.java provides a more complete example of setting of a simple Swing Glimpse application.
Glimpse provides tools to break up a single GlimpseCanvas into many (possibly nested) logical plotting areas which can each be painted on and receive mouse events. Each plotting area is defined by a GlimpseLayout (source) and arranged using Mig Layout constraints just like you might use to layout Swing Components. The screenshot below outlines the GlimpseLayouts from HeatMapExample. Although everything is rendered in a single OpenGL canvas, Glimpse allows mouse listeners to be attached to any GlimpseLayout and allows rendering to a specific GlimpseLayout.
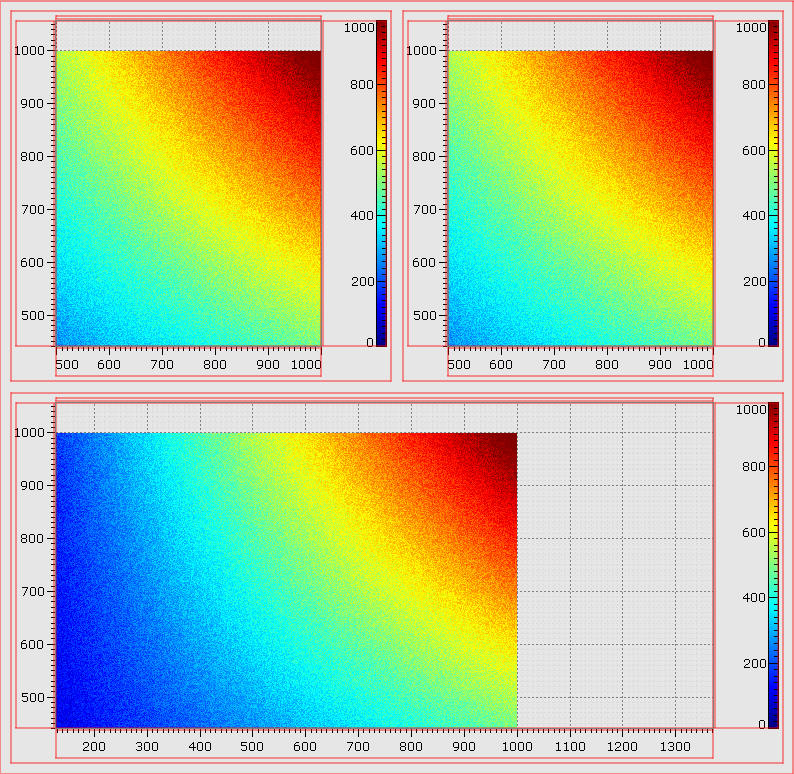
Even better, GlimpseLayouts can be nested, allowing easy construction of very complicated plots. For example, three simple heat map plots could be nested into a single hybrid plot. In the image below the GlimpseLayouts are again outlined in red. The example class SimpleLayoutExample.java demonstrates how Mig Layout is used to achieve this arrangement.
Once the plotting areas have been defined via GlimpseLayouts, OpenGL rendering inside GlimpseLayouts is performed by GlimpsePainters. Multiple GlimpsePainters can be added to a GlimpseLayout and act like layers. Glimpse provides lots of pre-built painters in the com.metsci.glimpse.painter package. However, most applications also want to perform custom rendering. The com.metsci.glimpse.painter.base package contains the GlimpsePainter interface, as well as a number of abstract helper implementations. In most cases, GlimpseDataPainter2D is a good place to start. It handles setting up the OpenGL viewport and scissor regions and projection matrix so that glVertex( ) calls will draw to the correct screen location based on the GlimpseLayout being painted into and the bounds of the data axes.
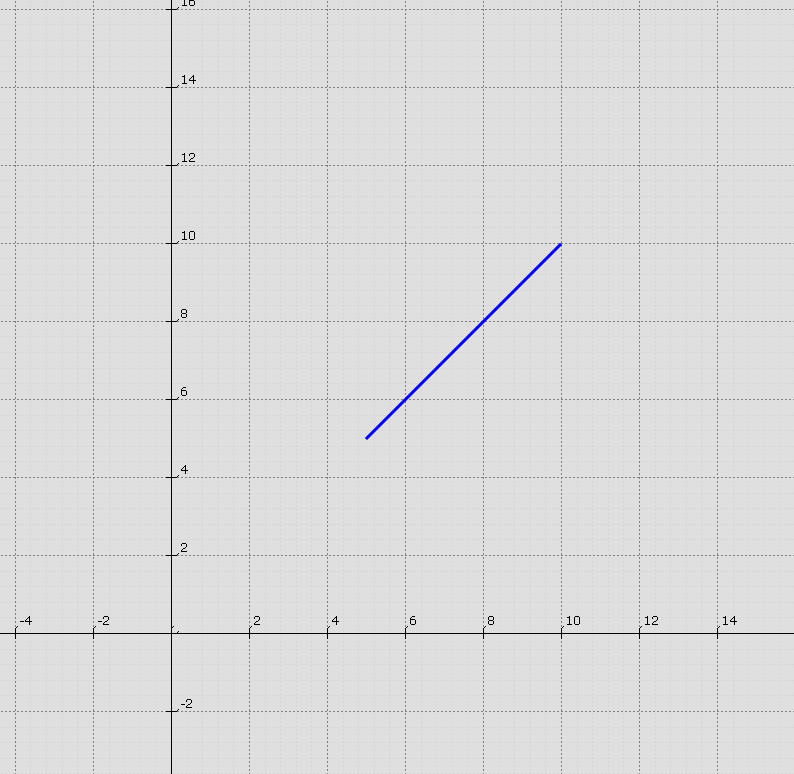
The following example demonstrates a very simple GlimpsePainter which draws a blue diagonal line from (5.0,5.0) to (10.0,10.0) in data coordinates. In the screenshot, a NumericXYAxisPainter (another GlimpsePainter) has also been added to the same GlimpseLayout to draw axis tick marks and labels.
public class SimplePainter extends GlimpseDataPainter2D
{
    @Override
    public void paintTo( GL gl, GlimpseBounds bounds, Axis2D axis )
    {
        gl.glColor3f( 0.0f, 0.0f, 1.0f );
        gl.glLineWidth( 3.0f );

        gl.glBegin( GL.GL_LINES );
        try
        {
            gl.glVertex2d( 5.0, 5.0 );
            gl.glVertex2d( 10.0, 10.0 );
        }
        finally
        {
            gl.glEnd( );
        }
    }
}
java.awt.Component). GlimpseMouseListener can be used to register for mouse clicks, GlimpseMouseMotionListener for mouse movement, and GlimpseMouseWheelListener for mouse wheel events.
The following snippet prints the x and y coordinates of any mouse click inside the GlimpseLayout.
GlimpseLayout layout = new GlimpseLayout( );
layout.addGlimpseMouseListener( new GlimpseMouseAdapter( ) {
    @Override
    public void mousePressed( GlimpseMouseEvent event )
    {
        System.out.printf( "(%d, %d)%n", event.getX( ), event.getY( ) );
    }
} );// create a new axis and set its min and max x and y values
Axis2D axis = new Axis2D( );
axis.set( 0, 20, -3, 3 );
// create a GlimpseAxisLayout2D which uses the axis to position
// data drawn by painters attached to the axis
GlimpseLayout layout = new GlimpseAxisLayout2D( axis );
// attach a mouse listener as before, but instead of printing
// the position of the mouse click in pixels, print the position
// of the mouse click in axis coordinates
layout.addGlimpseMouseListener( new GlimpseMouseAdapter( ) {
@Override
public void mousePressed( GlimpseMouseEvent event )
{
System.out.printf( "(%f, %f)%n", event.getAxisCoordinatesX( ), event.getAxisCoordinatesY( ) );
}
} );paintTo() method.
com.metsci.glimpse.plot package.
SimplePlot2D provides a basic plotting area with x, y, and z axes, a title, and grid lines.